Saturday, October 30, 2010

Halloween Spectacular

Every year Halloween comes around faster and faster it seems, but loaded with fun and yummy treats everytime. This week the kids got to put some of their cooking skills to use. On the docket are Mummy pizzas and Frankenstein marshmellows. We can't forget to throw in the some fun games, and then call it a day. First up are the Mummy pizzas. We saw this ideas when doing research for Halloween ideas, but I remember making these little pizzas as a birthday activity when I was little. There is definitely a lot you could do with this one, and it is easy for the kids to partake in, and many different age levels can do it and have fun doing it! All you need are a package of the biscuits in a tube, pizzas sauce, mozzarella cheese and whatever toppings you or the kids like. For our project we only needed an addition of sliced olives. You take one biscuit and with your fingers press out the dough until it is the shape and size you like. Then just put 1-2 tsp. of pizza sauce on top of the dough. I sliced up the mozzarella cheese into thin slices and laid them out criss-cross leaving some space across the top of the pressed out biscuit, and then added two sliced olives for the eyes of the mummy. You bake them by the instructions on the biscuit tube. We did 350 degrees for about 10 minutes, but the packages differ. They turned out like little mummy heads. We gave them the option of saving their pizza or eating it for their snack during class most kids couldn't refuse. They are super easy and pretty tasty kid treats. It's a great idea for at home parties because kids can make a few and it can be pretty cost effective.


We also made chocolate covered marshmallows to look like Frankensteins. All you need are green colored melts. Michaels usually carries a nice lime green color during Halloween, and they are made by Wilton. You could also color your own white chocolate melts to whatever color you would like. Wilton carries so many colors it is just easier unless you are trying to achieve a specific color. So back to the plan, green melts, chocolate (dark or bittersweet) chips, lollipop sticks, large marshmallows, and black frosting. Just melt both chocolates in bowls over simmering water. You could also melt them in the microwave in glass bowls or coffee mugs. First you dip or spread the green melted chocolate over the marshmallow and then let dry. You could place it on wax paper and put in refrigerator for a few minutes and it will harden very quickly. After the green chocolate is hard then dip just the top into the chocolate. You might need to use a knife or small spatula to smooth out the top, and let harden. Once the chocolate is hard take some black frosting (I bought mine, but you could make or color your own), and place a small tip on the end of the applicator. Squeeze out small dots for the eyes and side neck bolts on the marshmallows and draw a mouth on and your Frankenstein is ready to eat! The kids did a great job doing this. Since we didn't have a fridge in the classroom we took a cookie sheet and placed ice packs under it and then placed the cooling/hardening marshmallow treats on top to speed up the hardening process.

We also played a Monster Walk game with the kids and Hangman using only Halloween words. We had some prizes for all of the kids. It was a fun class.

Tic Tac Toe & Gestural Drawing

Road trips with children can be quite an adventure, and for whatever reason, maybe I like the torture of it all, we don't have a dvd player for our sweet little ones to enjoy along the way. If you are in the same boat as me I scramble for things for my girls to do along the way. When we came across this project I thought it would be such a great thing for my girls to do while sitting in the car for hours. Maybe just maybe it will stave off them asking, "how much longer until we're there" just a few minutes longer than they normally would. A traveling tic tac toe game! We make it all out of felt which is nice since felt tends to stick well to itself, making it harder to lose pieces. We precut the board and strips. The children each picked out their board color and glued the strips onto the board. We had templates for different icons for them to use as playing pieces. There were many to choose from x's, o's, squares, triangles, hearts, and stars. They picked their two playing pieces and traced them onto the two other colors of felt. This was a good challenge for children as they haven't quite learned how to efficiently use materials yet. We sort of forced the issue giving them smaller pieces and showing them ways to shift and move the pieces around to fit more than one shape onto the piece of felt. They then cut out all of their playing pieces. We then had them pick out a ribbon to tie up their game so they could take it with them wherever they go.


Today we discussed gestural drawing which is one of the easier drawing techniques, but harder for young children to understand. It is a good way to loosen up when getting ready to draw. Gestural drawing is essentially quick drawings that capture a moment, movement, or object. Gestural drawings don't focus on the detail but the shape and movement of the object. They tend to be a bit messier, but sometimes you just have to get "the idea" of what you are drawing. It is a good way to warm up when drawing, and if a form of sketching. I find most children try to focus on details, and really draw which is good, but they also can get very frustrated when it doesn't turn out like they thought. I find gestural drawing a good way to focus more on the big picture and then go back to the finer details once they have had a chance to draw the object quickly a few times. So our gestural drawing lesson was the children looking at a still life of small pumpkins and dried corn. I time them in short increments of 30 seconds to 60 seconds. It is a lot of fun, and the kids seem to enjoy it. It definitely relives them the pressure of having to make something look really good. Plus, they can become better artists practicing like this before they begin really drawing.

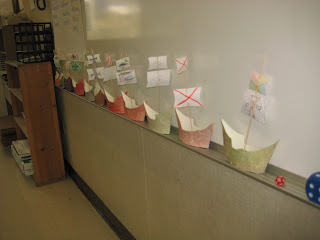
Columbus Day


Tuesday, October 5, 2010

Impressionist Pointillism with Analogous Color

Now that's quite a title. We did in fact go over just that with the kids today. I really love impressionism and the colors are beautiful. Though impressionist artists used such a different approach to creating color shifts, shades, and subtlety. Their technique at the time was shockingly unique. Many artists didn't try to hide their brush stroke, but instead adored it and highlighted it. One of the techniques they used was called pointillism, and at the time the term was used to describe their work in a negative connotation, but today all of that has subsided. How they used color was significant too, and so we discussed the basics of the color wheel with the class today. We talked about primary colors, a little bit about secondary colors, and glazed over tertiary color. Our main focus was on analogous color. Analogous colors are those colors that sit next to each other on the color wheel, such as, yellow, orange, and red. Green, blue, and purple are also analogous colors. The children picked three analogous colors to paint their canvas using the pointillism technique. We gave them special round sponge brushes to create the dotted technique, and encouraging them to fill the entire canvas while still being able to see all three colors. It was a small challenge since it is a departure from the traditional way to use a brush. The kids did a wonderful job filling in their canvas with their analogous colors. We topped it with a monogram. They had to cut out their letter glue it down, and fill the letter with buttons. It was a great exercise in scissor skills, gluing, and planning with buttons of all sizes. Some were creative and began stacking some of their buttons to create more relief to their "painting".


This week we also brought some clay for the children to play with if they finished their project early. I also told them if they created something I would take a picture of it for them and post it to the blog so here are some of the sculptures they created out of clay. It was a great day!


Autumn Trees and Bird Ornaments

Hot enough today? I think it was more like a sweltering, sweaty, mess. Much thanks to the custodian that came in to save the day and turned on the air-conditioner for our class!! I think that was much like the day trying to re-focus, since the heat keep most of us in a haze. Okay now re-focus on what the projects were for today. Fall has finally arrived officially, even though it seems as though summer has just started, we worked on a autumn tree watercolor project. The children using yellow, orange, and red tempera paints created a textured background. The idea was to sponge paint the background in autumn leaf colors. We encouraged the kids to let all colors show and use a little blending. Some enjoyed blending so much the background turned into a solid color, nonetheless, a beautiful autumn color. After the background dried we used a straw and black tempera paint to create the trunk and branches of the tree by blowing the paint onto the paper. The results turned out really interesting. Some kids ended up with large, thick trunks and tons of branches, and others with smaller trunks and few branches. The black tempera did need a little help, and some kids were more timid with blowing the paint around, but eventually they got it.

We also worked on a small sewing project, of a felt bird ornament. Using felt, a couple beads, and ribbon the kids were able to turn simple shapes into a super cute ornament. It was a good exercise in coordination having to thread ribbon and beads, and tying knots.