Tuesday, May 31, 2011

Spring Session 2011- Week Ten

Fathers' Day Goodness

I love our Dad's! Or in some cases Grandpas, uncles, brothers, and husbands. I always feel bad since Mother's Day typically falls during the school year we tend to dedicate a project to them, and poor Dad's day has fallen after school is out so the poor guy gets left in the dust. Well, not this year we are moving and shaking the schedule around so we can create some special tokens of our appreciation for our Father's. Dad's sometimes get the short end of the stick, and I want them to know that we are thinking of them, and trying to honor them this week. It wasn't easy coming up with a good project for Dad this week. I didn't want to give them a generic gift, or anything too girlie. Something useful is always good, and adding a personal touch to it should make it a hit. We decided this week to make our Father's a special card, and keychain with personalized flare on it. We started with hand painting something special on the back of a small, cool laminate sample. Then moving onto drawing with permanent markers onto shrink film. Finally, a nice card. Here are our creations:


Spring Session 2011- Week Nine

Pierced Paper Drawings & Signs of Summer Artwork

This weeks project has a funny title Pierced Paper Drawings. I came across this really amazing woman that created these and thought it could be a fun project for the kids. What we did was had the children draw a picture using pencil on white paper. White paper seemed to work best, but other colors could certainly be used, but the contrast between black and white shows up best. We encourage them to do simple line drawings without too much detail. Once they finished up with their drawings we gave them each a push pin with a pony bead hot glued on it, and a piece of cardboard. The bead is glued onto the push pin so it doesn't hit the table and dull the point. We also use a piece of cardboard so the pin has a "cushion" to go into. They just followed their drawing by poking holes along it to create their drawing. We then flipped it over and attached it to a black background. It is a really interesting way to create a drawing that is simply beautiful. The first two photos are by an artist Heather Smith Jones where the idea stemmed from.


Our second project for the day was our signs of summer. We talked about all of the signs or symbols that represent summer. We used a textured paper and had them create anywhere from 4 to 8 boxes on their paper. In each box using oil pastels drew a sign that represented summer for them. Living in California it tends to get a little bit fuzzy sometimes where summer starts and ends, but we came up with a large master list of signs/symbols. It was a fun project that turned out quite well. Oil pastels are a great medium that the kids tend to like using and have a wonderful richness to them.


Spring Session 2011- Week Eight

Swimming the Sea Watercolors and Foil Fish

Since May is Asian Pacific American Heritage Month we thought we would give a nod to that culture by doing a project that dealt with the ocean, fish, and watercolors. This is a great project to do for the texture alone. It creates beautiful and to some extent random textures on your watercolor painting. Once you paint your picture and it is still wet sprinkle some salt on it and the result is magical and amazing. You just need to let it dry first and then wipe away all of the salt to reveal the beauty it has left behind. We used this technique only on the ocean/water part of the painting to imitate waves and those great white-caps that you see in water and the ocean. We then had them do the sky whatever color they wanted, and however they viewed the sky to be. Some did sunsets, some did blue skies, and some created wonderful patterns for the sky. We then had the children cut out their water/waves and glue them onto their sky. The next part of the project was to create the fish out of foil. We did a rubbing technique for create fish scales on the foil. We used old netting from fruit and candy and taped it onto some cardboard then placed a piece of foil over it. The children then rubbed with the backs of their finger nails to emboss the foil with the "scale" pattern for the fish. We used sharpies to draw over fish over the scales and it create a pretty convincing fish. In one class we had a little extra time this week, so we played some bingo in the last few minutes. A great way to pass some time and keep the kids focused.


Spring Session 2011- Week Seven

Let's Make Pasta Salad!

Now pretty much everytime I see or hear the word salad that Wiggles tune goes off in my head...fruit salad yummy yummy. Is it possible to delete that tune from my brain somehow by using the delete key. Oh one can dream. It is too bad though since I do enjoy a good salad be it fruit, green, or pasta. Trying to get my kids to eat veggies isn't horrible, they do okay, but as I say it can improve. So, since so many kids seem to LOVE pasta, we thought we might try to sneak some veggies in by making a pasta salad with them this week. So we brought along many different veggies to add to their pasta salad, and we gave them the choice of two different dressings. We made both dressings in class. First, we made the pesto dressing and we had all of the kids help make it by adding all of the different ingredients. Our pesto dressing included basil, spinach, parsley, olive oil, salt, pepper, lemon, and garlic. I brought along my food processor to mix all of the yummy ingredients up. We didn't add any nuts or cheese to the dressing because we wanted to be more like a dressing rather than a sauce. Plus, they had the choice to add some Parmesan to their pasta salad during the mix up if they wanted too. The second dressing we made was the balsamic vinaigrette dressing. We used olive oil, balsamic vinegar, salt, pepper, garlic, lemon, and some mustard. I hand whisked this dressing all together. After we made both dressings we let the kids taste test most of the veggies with each dressing. We had a whole buffet of veggies in the offering. Cauliflower, Cheddar Cauliflower, broccoli, zucchini, carrots, purple onion, mozzarella cheese, Parmesan cheese, tomatoes, celery, and olives. Most kids did a great job creating a nice pasta salad with a decent amount of veggies in it.

We also had the kids draw their own placemat pal. We sewed up a bunch of placemats with a small pocket on them that the kids could then draw their own pal on using fabric markers. They can use the pocket to put their utensils and napkin in when they set the table (wink, wink).


Saturday, May 21, 2011

Spring Session 2011- Week Six

Monoprints & Cute Animal Drawing tips

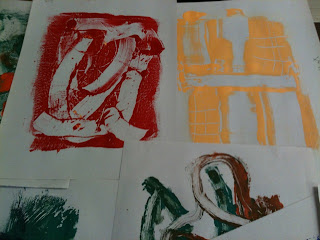
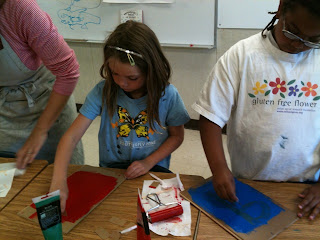
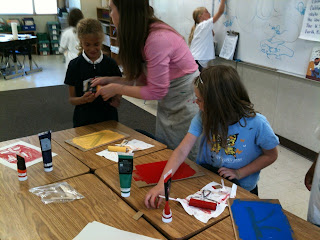
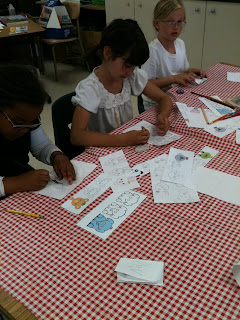
I know I say "I love blah blah blah" in almost every post, but I love monoprints. Monoprint technique for me is very open, freeing, random, abstract, relaxing, and satisfying. The history of printmaking is so old, and the machinery that they used to use, and some still do is antiquated and beautiful. One of my goals is to be able to have the children experience many different kinds of art techniques. Everyone has their own response to different mediums. Some kids enjoy just being creative with anything you throw in front of them, and others have specific callings. Printing to me seems magical. When you pull your print it suddenly transforms from ink on a blot to artwork on a piece of paper. I'm simplifying, but it is still an element of surprise. We did two types of monoprints with the kids this week. We did a one color subtractive color print, and a multi-colored painted print. The one color print is where you take one color of printing ink, and roll it out on a plate (a flat surface such as plexiglass, we used old laminate flooring) with a brayer to an even consistency. You then use a piece of cardstock, stiff brush, fork, or almost anything that will take away ink. Use the piece of cardstock and wipe away ink off of the plate. Once they were done we then take the paper and carefully lay it over the top of the plate and using your hand press and wipe it all over so the paint can transfer onto the paper. Then carefully pull it off of the plate and enjoy your beautiful print.

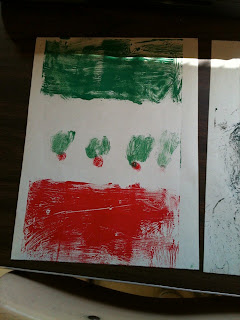
Then we let the kids paint the printing ink on their plate with different colors, and then carefully placed the paper on top, and then rubbed the paper onto the plate. After that the kids pulled up the paper carefully to reveal their hand painted print.


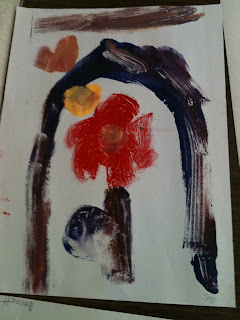
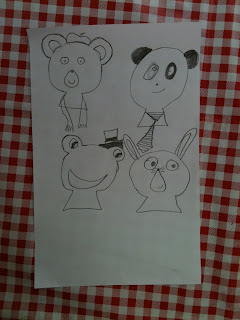
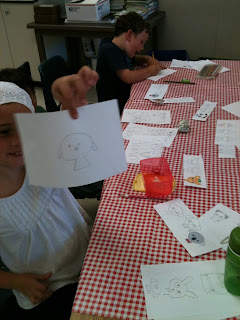
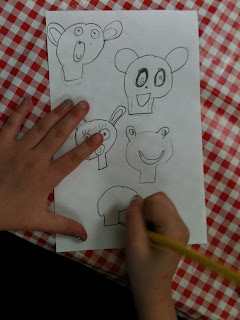
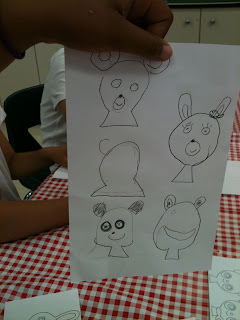
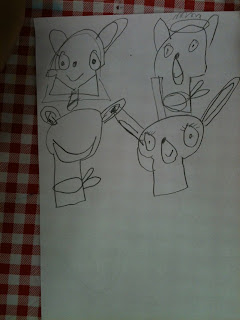
After printing we did a small lesson on hoe to draw simple cute animals. Often in class we have the kids draw things, and often the kids say they don't know how to draw this or that. So we thought it would be a good idea to show them some simple tricks to draw some easy animals. We provided simple instructions and a basic shape to begin with that was a keyhole. From there we showed the children how to create many different animals from that same shape. After we went through many options we asked them to try and create their own animal using the same keyhole shape.